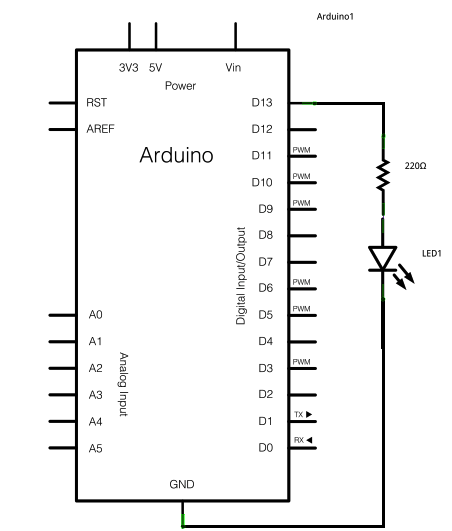
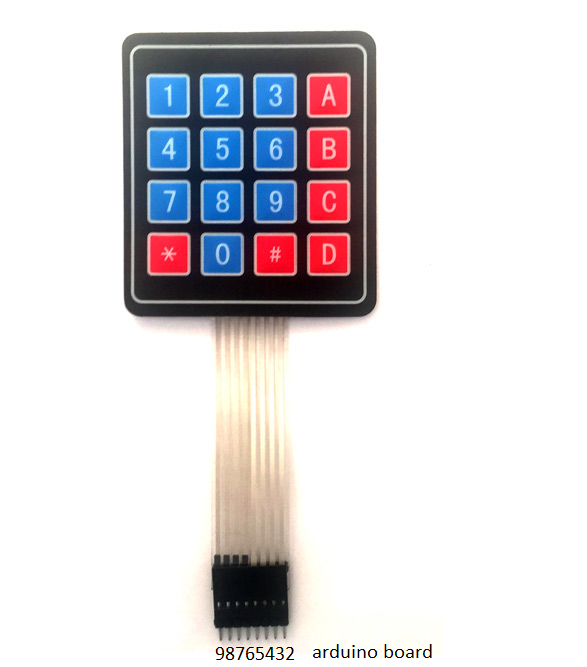
menu

Back To Home

Friday, December 27, 2019

Arduino Uno R3 - keypad 4x4

Pin connection:


Driver download:

http://robojax.com/learn/arduino/robojax-Keypad.zip

Arduino program:

#include <Keypad.h>

const byte ROWS = 4; //four rows
const byte COLS = 4; //three columns
char keys[ROWS][COLS] = {
  {'1','2','3','A'},
  {'4','5','6','B'},
  {'7','8','9','C'},
  {'*','0','#','D'}
};

byte rowPins[ROWS] = {2, 3, 4, 5}; //connect to the row pinouts of the keypad
byte colPins[COLS] = {6,7,8,9}; //connect to the column pinouts of the keypad

Keypad keypad = Keypad( makeKeymap(keys), rowPins, colPins, ROWS, COLS );

void setup(){
  Serial.begin(9600);
}
  
void loop(){
  char key = keypad.getKey();
    // just print the pressed key
   if (key){
    Serial.println(key);
  } 
  
  // this checkes if 4 is pressed, then do something. Here  we print the text but you can control something.
  if (key =='4'){
    Serial.println("Key 4 is pressed");
  }
}

Wednesday, December 25, 2019

Arduino uno R3-Interrupt


This video show how to interrupt a running program. We just need to use attachInterrupt API to achieve our purpose.

Interrupt function for arduino:

 Switch:


PIN connection:


Arduino program:


volatile int ledon=0;

void setup() {
  // put your setup code here, to run once:
pinMode(13,OUTPUT);
//pinMode(2,INPUT);
attachInterrupt(1,buttonFunc,HIGH);
}

void loop() {

  if(ledon)
  {
    digitalWrite(13,HIGH);
    delay(300);
    digitalWrite(13,LOW);
    delay(300);
 
  }

}
void buttonFunc() {
  // put your main code here, to run repeatedly

ledon=1;
}

Tuesday, December 24, 2019

TC74 I2C temperature sensor using arduino uno R3

In this video we going to use TC74 temp sensor IC. The IC uisng I2C communication protocol. I use arduino uno R3  to read the data and display in laptop monitor.

About I2C:
https://en.wikipedia.org/wiki/I%C2%B2C


TC74 connection to arduino uno R3  :

PIN2-SDA(A04)
PIN3-Arduino GND
PIN4-SCL(A05)
PIN5-5V


Arduino program:

#include <Wire.h>

int temp_address=72;

void setup()
{
   
Serial.begin(9600);
Wire.begin();
}

void loop()
{


Wire.beginTransmission(temp_address);
Wire.write(0);
Wire.endTransmission();
Wire.requestFrom(address, 1);

while (Wire.available()==0);
int c = Wire.read();
int f =round(c*9.0/5.0+32.0);
Serial.print(c);
Serial.print("C,");
Serial.print(f);
Serial.print("F");

delay(5000);
}


Saturday, December 21, 2019

SPI potentiometer AD8402 and arduino uno R3

This video will show you the SPI communication between IC and arduino board.

Pin connection from IC AD8402 SPI potentiometer to arduino uno R3:

PIN B1 - Connect 10kohm to gnd arduino.
PIN W1- Connect 220ohm to LED and to gnd arduino.
PIN VDD - Connect to VCC
PIN RS - Connect to VCC
PIN CLK- Connect to PIN13
PIN SDI- Connect to PIN11
PIN SHDN- Connect to VCC
PIN CS- Connect to PIN10

Datasheet for AD8402:

Arduino program:

#include<SPI.h>

 int ss=10; 
void setup() {
  // put your setup code here, to run once:
pinMode(ss,OUTPUT);
SPI.begin();
}


void setLed(int reg,int level)
{
  digitalWrite(ss,LOW);
  SPI.transfer(reg);
  SPI.transfer(level);
   digitalWrite(ss,HIGH);
  
}


void loop() {
  // put your main code here, to run repeatedly:
  
for(int j=50;j<=255;j++)
{
  setLed(0,j);
  delay(20);
}

for(int j=255;j>=50;j--)
{
  setLed(0,j);
  delay(20);
}

}


Arduino uno R3-I2C LCD

In this video, you will learn how to communicate LCD through I2C.

I2C protocol:
You can refer to https://en.wikipedia.org/wiki/I%C2%B2C

Connection:
IC - Arduino
CLK-A5
SDA-A4
VCC-5V
GND-GND

Driver file is available here:
http://robojax.com/learn/arduino/?vid=robojax-LCD1602-I2C


C# Write serial data to Arduino uno R3


Arduino program:

int data;
void setup() {
  // put your setup code here, to run once:
Serial.begin(9600);
pinMode(13,OUTPUT);
}

void loop() {
  // put your main code here, to run repeatedly:
if(Serial.available()){
  data=Serial.read();
  if(data=='A'){
    digitalWrite(13,HIGH);
  }
  else {
    digitalWrite(13,LOW);
  }
}
}

C# program:

using System;
using System.Collections.Generic;
using System.ComponentModel;
using System.Data;
using System.Drawing;
using System.Linq;
using System.Text;
using System.Threading.Tasks;
using System.Windows.Forms;

namespace C_write_data
{
    public partial class Form1 : Form
    {
        public Form1()
        {
            InitializeComponent();
            serialPort1.Open();
        }

        private void button1_Click(object sender, EventArgs e)
        {
            serialPort1.Write("A");
        }

        private void button2_Click(object sender, EventArgs e)
        {
            serialPort1.Write("J");
        }
    }
}


C# GUI:


Video:

Thursday, December 19, 2019

Arduino uno R3- Blinking LED

Schematic:

Image result for blinking led arduino D13


Program:

#define LED_BUITIN 13

void setup() {
  pinMode(LED_BUILTIN, OUTPUT);
}

void loop() {
  digitalWrite(LED_BUILTIN, HIGH); 
  delay(100);                 
  digitalWrite(LED_BUILTIN, LOW); 
  delay(100);                   
}